How to Set Up a Projector in an Apartment Without Drilling: Step‑by‑Step No‑Drill Mounting, Screen & Sound Guide
Introduction
Creating a home‑theater experience in an apartment often seems impossible because permanent mounting is prohibited by many leases. This guide demonstrates how to achieve a professional‑looking projection setup without drilling any holes, preserving walls and ceilings for future tenants. Readers will learn to select stable, portable stands, install a wrinkle‑free screen, and arrange sound for immersive viewing. The methods described rely on products that are affordable, highly rated, and specifically designed for temporary installations.
What You'll Need
- A portable projector stand or tripod (e.g., LEORFI Adjustable Tripod Stand or Coret Portable Tripod Stand)
- An easy‑setup projector screen (e.g., CPLIRIS 120‑Inch Outdoor Screen)
- Velcro or command strips for cable routing
- Non‑slip pads or rubber feet
- Extension cords and HDMI cable
- Optional portable Bluetooth speakers or a soundbar
Step 1: Choose the Optimal Projection Location
Identify a wall that receives minimal natural light during viewing hours; a darker surface enhances contrast and reduces glare. Measure the distance from the wall to the seating area to ensure the projector’s throw distance matches the screen size. Verify that the floor can support a stand without causing wobble; carpeted surfaces often provide extra stability. Finally, confirm that power outlets are within reach of the projected setup to avoid unsightly extension cords.
Step 2: Prepare the Floor and Wall for a No‑Drill Mount
Place non‑slip pads under the projector stand to prevent movement on smooth flooring; these pads distribute weight evenly and protect the floor finish. Use command strips to secure lightweight cable organizers to the wall, keeping HDMI and power cords tidy without adhesive damage. If the chosen wall is painted, test a small hidden area with the strip to ensure it removes cleanly. This preparation creates a clean, professional appearance while adhering to lease restrictions.
Step 3: Set Up the Projector Stand
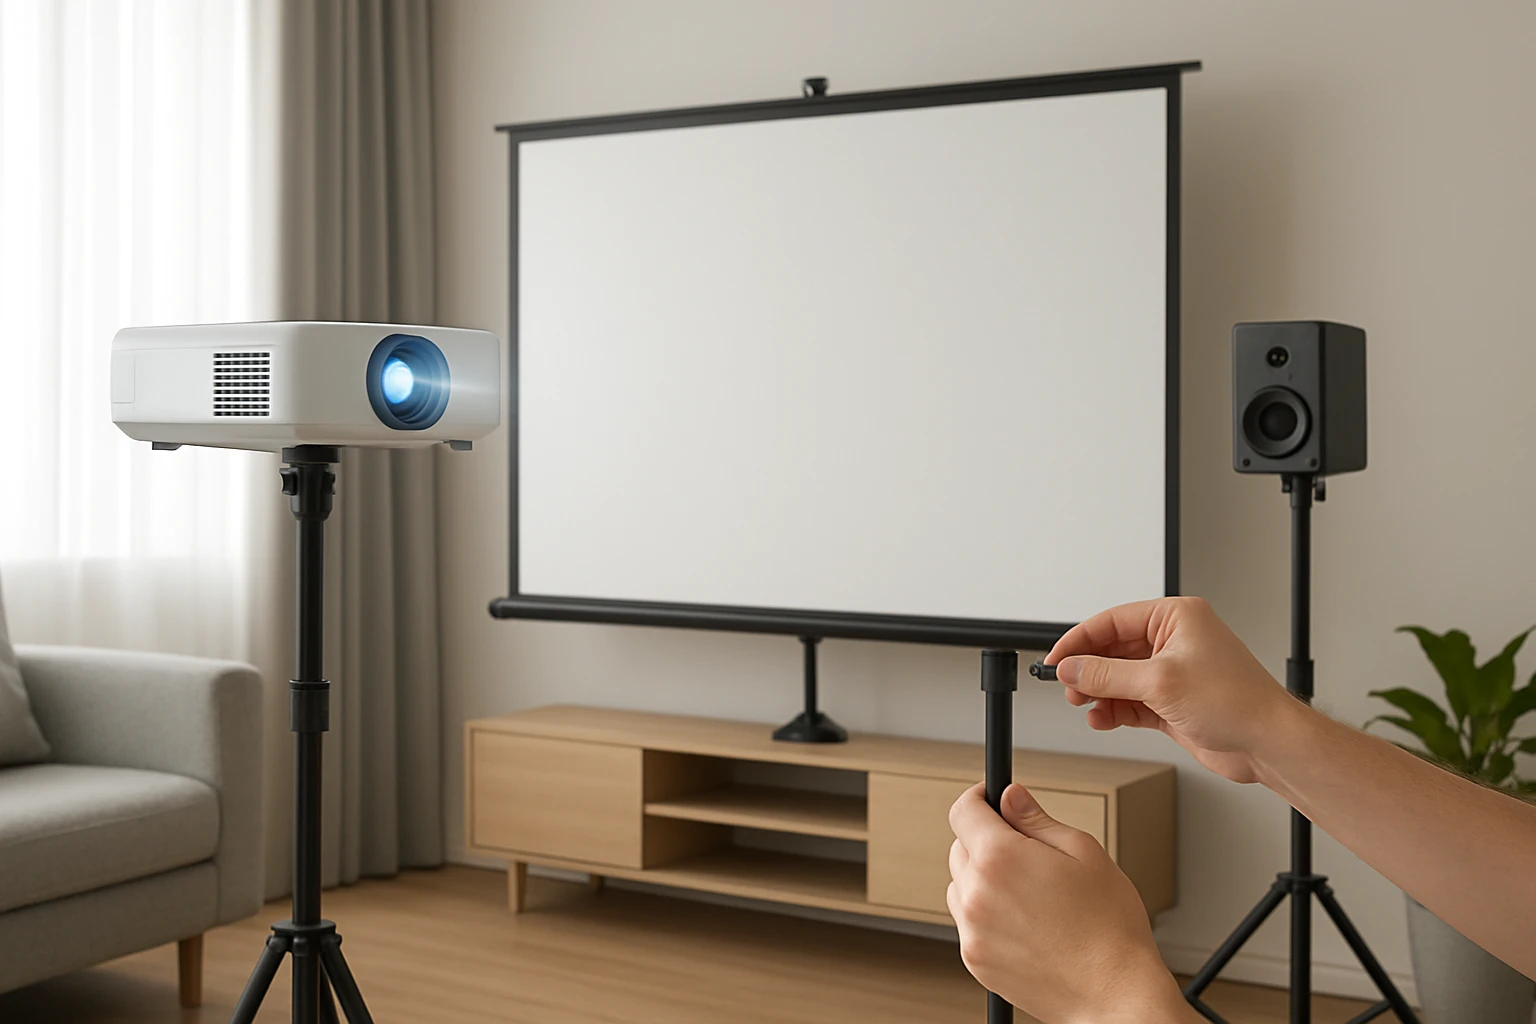
For most apartments, a sturdy yet portable stand is essential. The LEORFI Adjustable Tripod Stand offers a load capacity of 22 lb, making it suitable for most home projectors. Its iron folding plate provides a secure platform, while the brushed‑steel tubing resists rust and bending, ensuring stability even on uneven floors. Height adjustment from 17.7" to 45.2" allows precise alignment with the screen, eliminating the need for ceiling mounts. The stand assembles in under 30 seconds, and the included non‑slip pad further reduces vibration during playback.
If space is extremely limited, the Coret Portable Tripod Stand is a lighter alternative at 1.1 lb, folding to a compact size for storage. It supports up to 4 lb, which is adequate for mini projectors. The 360° rotatable head enables fine‑tuning of the projection angle without additional tools. Both stands eliminate the need for drilling, but the LEORFI model provides greater load capacity and a larger top tray (13.4" × 9.68") for additional accessories such as a small speaker.
Step 4: Install the Projection Screen Without Wall‑Mounts
The CPLIRIS 120‑Inch Outdoor Screen is engineered for quick, tool‑free assembly, making it ideal for renters. Its weighted chassis and ground‑spike system keep the screen stable on carpet or hardwood without penetrating the floor. The screen folds into a compact bag (7.8 × 17.7 in), allowing storage in a closet when not in use. The wrinkle‑free polyester milk‑silk material delivers a sharp 4K‑compatible image, and the 160° viewing angle ensures all viewers enjoy a uniform picture.
To set up, spread the screen on the floor, attach the two wind ropes to the chassis holes, and drive the eight ground nails into the carpet or use the supplied weighted base if drilling is prohibited. The screen can also be leaned against a sturdy piece of furniture, such as a bookshelf, if floor anchoring is undesirable. This flexibility guarantees a stable display while respecting lease agreements.
Step 5: Position the Projector and Align the Image
Place the projector on the chosen stand, ensuring the lens is centered horizontally with the screen. Adjust the stand height so the projected image fills the screen without distortion; most projectors have a keystone correction feature for minor angle adjustments. Use the stand’s locking mechanism to secure the height once the optimal position is found. Verify focus by projecting a test pattern and adjusting the lens until edges appear crisp.
Step 6: Arrange Sound for an Immersive Experience
While many projectors include built‑in speakers, their output is often insufficient for a dedicated viewing area. Position a portable Bluetooth speaker or a compact soundbar on a side table, ensuring it is within the Bluetooth range of the projector. If using wired speakers, route the audio cable through the same command‑strip cable organizer used for HDMI to keep the floor tidy. For optimal stereo separation, place speakers at ear level and slightly angled toward the seating area.
Step 7: Manage Cables Cleanly and Securely
Run the HDMI and power cables along the wall using the previously applied command strips, securing them every 12‑18 inches. If the cables must cross a walkway, use a low‑profile cable cover that adheres without nails. This method prevents tripping hazards and maintains the aesthetic of a clean, professional setup. Finally, label each cable with a small tag to simplify future re‑configuration or troubleshooting.
Tips & Pro Tips
- Use blackout curtains or a dark room to enhance contrast, especially when the screen is placed near a window.
- Calibrate the projector’s color settings using a calibration disc for accurate color reproduction.
- If the floor is slippery, add an additional rubber mat under the stand for extra grip.
- For outdoor balcony use, anchor the CPLIRIS screen with the wind ropes to prevent wind‑induced wobble.
- Store the screen in its bag during off‑season to protect the fabric from dust and UV damage.
Troubleshooting
Image is blurry: Re‑focus the projector lens, ensure the screen is taut, and verify that the projector is at the correct throw distance.
Screen wobbles: Add extra weight to the chassis, tighten the wind ropes, or place the screen against a solid piece of furniture for additional support.
Audio lag: Check the projector’s audio output settings; switch to Bluetooth or use an external audio decoder if latency persists.
Conclusion
By following these steps, one can establish a high‑quality projection system in an apartment without violating lease terms or damaging property. Portable stands such as the LEORFI Adjustable Tripod Stand provide sturdy, height‑adjustable support, while the CPLIRIS 120‑Inch Outdoor Screen delivers a crisp, large‑format image without permanent fixtures. Proper cable management and sound placement complete the immersive experience, allowing renters to enjoy movies, games, and presentations with cinematic flair.
Implement the outlined techniques, and transform any living space into a personal theater that can be assembled and disassembled in minutes. The flexibility of no‑drill solutions ensures that the setup can travel with you to future homes, preserving both your entertainment quality and your rental agreement.
Products Mentioned in This Guide
LEORFI Adjustable Tripod Stand
Price: $22.72 | Rating: 4.5/5 (277 reviews)
Features: Iron folding plate with 22 lb capacity, height adjustable 17.7"‑45.2", sturdy brushed‑steel tubing, quick 30‑second setup.
Coret Portable Tripod Stand
Price: $18.98 | Rating: 4/5 (1,152 reviews)
Features: Height adjustable 18"‑40", 360° rotatable head, lightweight 1.1 lb, supports up to 4 lb, folds for travel.
CPLIRIS 120‑Inch Outdoor Screen
Price: $45.21 | Rating: 4.2/5 (69 reviews)
Features: Weighted chassis with ground anchors, wrinkle‑free 3‑pocket polyester screen, 160° viewing angle, tool‑free assembly, portable carry bag.
Frequently Asked Questions
Can I mount a projector in an apartment without drilling?
Yes, use a portable tripod stand or floor‑standing mount that balances the projector on the floor or a sturdy table.
What is the best type of screen for a no‑drill setup?
A lightweight, tension‑pull or magnetic screen that attaches to a wall with command strips or a freestanding frame works best.
How can I hide cables without damaging walls?
Use Velcro or command strip cable organizers to route wires along baseboards or behind furniture.
Do I need a separate sound system for a projector in a small apartment?
A compact soundbar or Bluetooth speakers provide clear audio without the need for large speakers or wall mounting.
Will a portable projector stand stay stable on carpeted floors?
Place a non‑slip pad under the stand to prevent movement and ensure a level surface on carpet or hardwood.