DIY Battery Mod for Mini Projectors: Complete Safety Guide
Introduction
Mini projectors have become popular for portable entertainment, yet their built‑in batteries often limit runtime and flexibility. This guide explains how to design and install a custom battery pack while maintaining the highest safety standards. Readers will learn the electrical fundamentals, how to choose appropriate cells, wiring techniques, and testing procedures. By the end of the article, one will be able to extend viewing time without compromising the projector’s reliability.
Background and Context
Most modern mini projectors operate at 5 V to 12 V input and draw between 2 A and 5 A depending on brightness settings. Understanding voltage, current, capacity (mAh), and discharge rates (C‑rating) is essential before attempting any modification. Battery chemistry—Lithium‑Ion (Li‑ion), Lithium‑Polymer (Li‑Po), and Nickel‑Metal Hydride (NiMH)—offers distinct trade‑offs in energy density, safety, and charging complexity. Additionally, the projector’s power management circuitry may expect a stable voltage; abrupt drops can trigger shutdowns or damage internal components.
Understanding Mini Projector Power Requirements
Before selecting a battery, verify the projector’s specifications. The Happrun 1080P Bluetooth Projector operates from a 5 V USB‑C input and consumes up to 3 A at maximum brightness. This translates to a maximum power draw of 15 W, which informs the minimum current rating for any battery pack. It is advisable to oversize the current capability by 20 percent to accommodate transient spikes.
Measure the projector’s idle and peak current using a clamp meter or a USB power monitor. Record both values; they will guide the selection of cell configuration and connector gauge. Remember that a higher voltage battery must be regulated down to the projector’s required voltage using a buck converter with adequate efficiency (≥90 %).
Selecting the Right Battery Chemistry
Three common chemistries dominate the DIY market:
- Li‑ion (18650): Offers 2600‑3400 mAh per cell, a nominal voltage of 3.7 V, and a moderate C‑rating. It is widely available and relatively safe when paired with a proper battery management system (BMS).
- Li‑Po (pouch): Provides higher energy density and flexible form factors, but requires careful handling to avoid puncture and swelling. Typical discharge rates range from 20 C to 30 C.
- NiMH: Lower energy density (≈1000 mAh per AA) and higher self‑discharge, yet it is tolerant of over‑charge and does not require a BMS. It is suitable for low‑cost, low‑risk projects.
For a projector that draws up to 3 A, a 2‑cell Li‑ion pack (7.4 V nominal) paired with a buck regulator to 5 V is a balanced choice. The pack should include a BMS that limits charge voltage to 4.2 V per cell and provides over‑current protection.
Designing a Safe Battery Pack
Calculate the required capacity using the formula: Desired runtime (hours) × projector power (W) ÷ battery voltage (V). For a 4‑hour session at 15 W using a 7.4 V pack, the required capacity is (4 × 15) ÷ 7.4 ≈ 8.1 Ah, or 8100 mAh. Two 18650 cells in parallel (2 P) provide roughly 6000‑6800 mAh, which yields about 3 hours; adding a third parallel string (3 P) reaches the target.
Arrange cells in a 2 S 3 P configuration (two cells in series, three in parallel) to achieve 7.4 V nominal and 8100 mAh capacity. Use nickel‑striped bus bars or spot‑welded nickel tabs to ensure low resistance connections. Insulate all exposed conductors with heat‑shrink tubing rated for at least 90 °C.
Wiring, Connectors, and Voltage Regulation
Select connectors that can handle the peak current. A 4 mm barrel jack or a USB‑C PD (Power Delivery) receptacle rated for 5 A is appropriate. Verify that the wire gauge follows the American Wire Gauge (AWG) chart: for 5 A, a minimum of 20 AWG copper is recommended, though 18 AWG provides additional safety margin.
Integrate a buck converter that accepts 7.4‑8.4 V input and outputs a stable 5 V at 3 A or higher. Modules based on the LM2596 or MP1584 chips are widely available and include adjustable potentiometers for fine‑tuning. Test the converter under load before connecting to the projector to confirm voltage stability.
Integrating the Battery Pack with the Projector
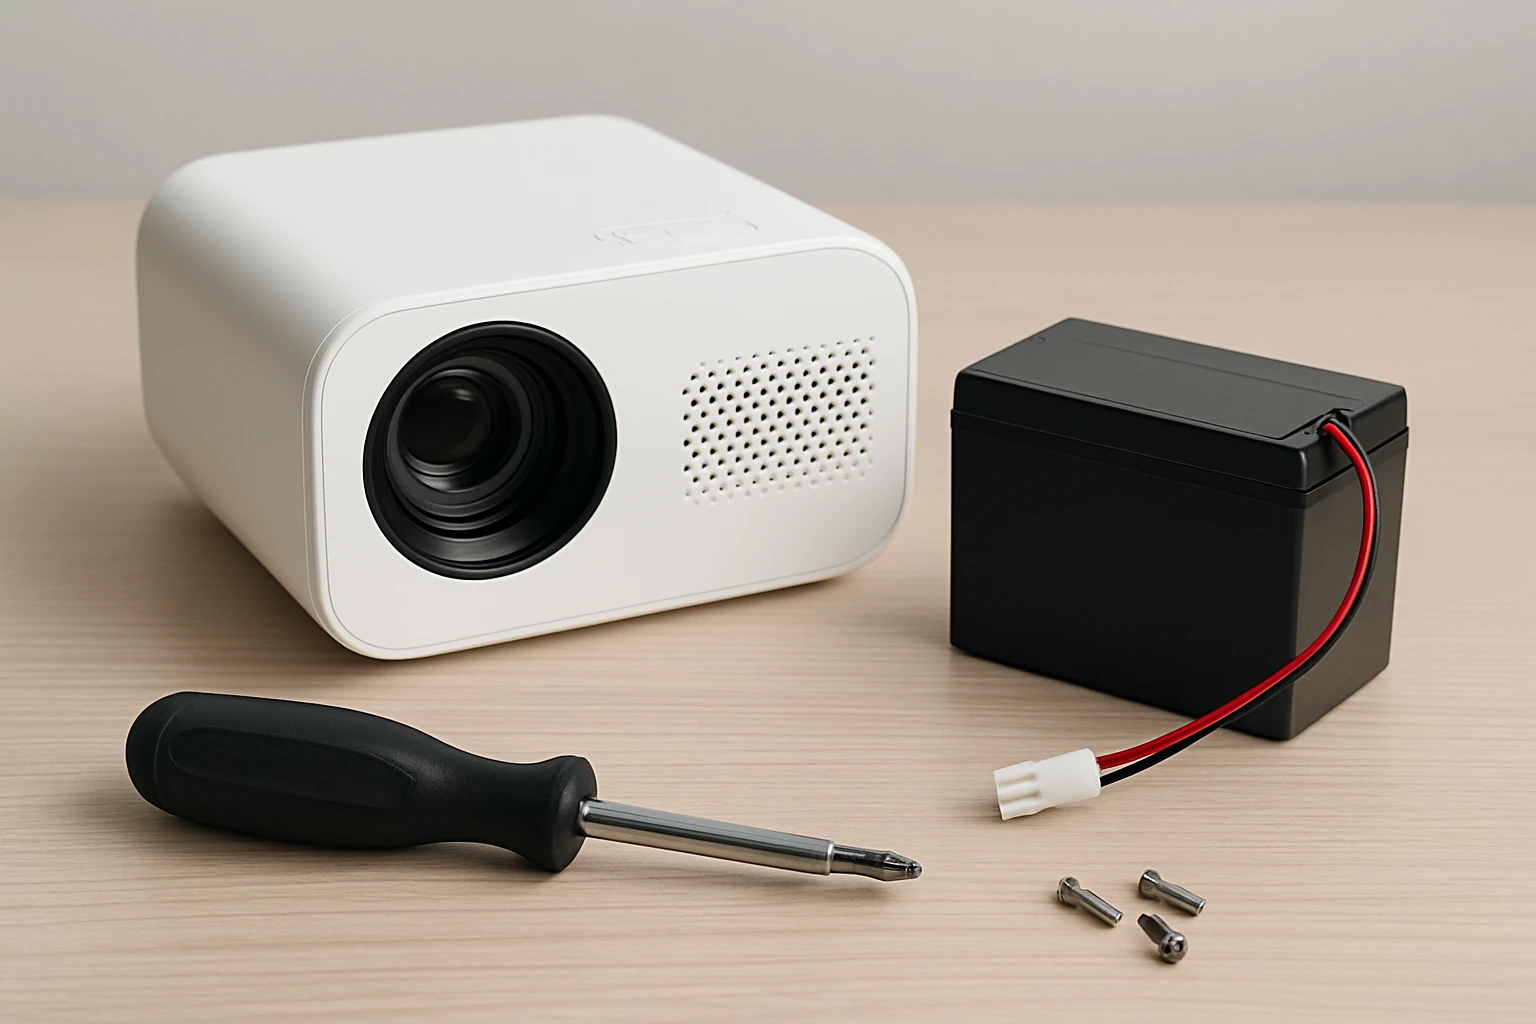
Open the projector’s rear panel to locate the existing power input. Many mini projectors, including the Happrun model, feature a USB‑C port; a short USB‑C cable can be repurposed as the power conduit. If the projector has a barrel jack, match the polarity and secure the connector with a strain‑relief boot.
Secure the battery pack in a protective enclosure—ideally a fire‑rated case with ventilation holes. Mount the BMS and buck converter inside the same enclosure to reduce cable clutter and protect against accidental short circuits. Ensure that the enclosure can be opened for maintenance without damaging the cells.
Testing and Validation
Before first use, perform a series of tests:
- Measure open‑circuit voltage of each cell; they should read between 3.6 V and 4.2 V.
- Connect the BMS and verify that the balance leads report equal voltage across cells.
- Apply a dummy load (e.g., a 5 Ω resistor) to the buck converter and confirm that the output remains within 5 ± 0.1 V.
- Run the projector at low brightness for 30 minutes, monitoring temperature of the battery pack and converter.
- Increase brightness to maximum and observe for any voltage sag or overheating.
If any parameter exceeds safe limits—such as temperature above 45 °C or voltage drop below 4.8 V—re‑evaluate cell arrangement, cooling, or converter rating. Document all test results for future reference.
Safety Precautions and Best Practices
Adhere to the following safety guidelines throughout the project:
- Always use a dedicated Li‑ion charger that incorporates cell‑balancing and terminates at 4.2 V per cell.
- Never short the terminals; keep conductive tools insulated and store cells in anti‑static bags when not in use.
- Install a fire‑resistant enclosure and keep a Class D fire extinguisher nearby.
- Label the pack with voltage, capacity, and date of assembly to avoid confusion during future repairs.
- Periodically inspect cells for swelling, corrosion, or damage; replace any compromised cell immediately.
When transporting the modified projector, place the battery pack in a separate padded compartment to reduce impact forces. Avoid exposing the pack to extreme temperatures, as both high heat and deep cold can degrade performance and safety.
Comparison and Selection Guide
| Feature | Li‑ion (18650) | Li‑Po (Pouch) | NiMH (AA) |
|---|---|---|---|
| Energy Density (Wh/kg) | 200‑250 | 250‑300 | 70‑100 |
| Typical Capacity per Cell | 2600‑3400 mAh | 3000‑5000 mAh (varies) | 1000‑1500 mAh |
| Maximum Continuous Discharge | 2‑3 C | 20‑30 C | 1‑2 C |
| Safety Requirements | Requires BMS, careful charging | Requires BMS, puncture protection | Minimal; no BMS needed |
| Cost per Wh | Moderate | Higher | Low |
For most projector mods, a Li‑ion pack offers the best compromise between cost, safety, and energy density. Li‑Po packs excel when space is extremely limited, but they demand meticulous handling. NiMH is suitable only for low‑power projects or as a fallback when safety concerns outweigh runtime.
Best Practices & Tips
Consider the following expert tips to streamline the mod process:
- Use a multimeter with a data‑logging function to capture voltage trends during prolonged use.
- Apply thermal paste between the buck converter and a small aluminum heat sink to improve heat dissipation.
- Employ silicone potting compound around the BMS to protect against moisture and accidental shorting.
- Label each wire with color‑coded heat‑shrink markers for quick troubleshooting.
- Maintain a spare set of cells and a calibrated charger to ensure uninterrupted operation during travel.
Frequently Asked Questions
1. Can I use a USB power bank instead of building a custom pack?
Yes, a high‑capacity USB‑C power bank rated for 5 V/3 A can power the projector, but it adds bulk and may not provide the same runtime as a dedicated pack designed for the projector’s voltage.
2. Do I need a BMS for a NiMH pack?
No, NiMH cells are tolerant of over‑charge and over‑discharge, though a simple voltage monitor is still advisable to prevent deep discharge.
3. How do I know if my buck converter is efficient enough?
Measure input and output power; efficiency is output power divided by input power. Aim for at least 90 % to minimize heat generation.
4. What is the safest way to charge the custom pack?
Use a charger that supports multi‑cell balancing and terminates each cell at 4.2 V. Do not charge the pack while it is connected to the projector.
5. Will modifying the power source void the projector’s warranty?
Yes, any alteration to the internal power circuitry typically voids the manufacturer’s warranty. Perform the mod at your own risk.
6. Can I add a solar panel for outdoor use?
It is possible to integrate a solar charge controller that feeds the BMS, but the panel must provide sufficient voltage and current to charge the pack safely.
7. How often should I replace the cells?
Li‑ion cells degrade after 300‑500 full charge cycles. Monitor capacity loss; replace the pack when runtime drops below 80 % of the original.
Conclusion
Modifying a mini projector with a custom battery pack can dramatically extend viewing sessions while preserving portability. By understanding power requirements, selecting appropriate chemistry, and adhering to rigorous safety protocols, one can create a reliable solution that outperforms factory batteries. The process demands careful planning, precise wiring, and thorough testing, but the reward is a versatile, long‑lasting entertainment system suitable for indoor and outdoor environments.
Products Featured in This Guide

Happrun 1080P Bluetooth Projector
Price: $139.99
Rating: Not available
Why featured: It exemplifies a portable mini projector whose built‑in battery is often insufficient for extended outdoor screenings, making it an ideal candidate for a DIY battery upgrade.
Frequently Asked Questions
What voltage range should a custom battery pack provide for most mini projectors?
Most mini projectors need a stable 5 V to 12 V input, so the pack should stay within that range and never exceed the projector’s maximum rating.
Which battery chemistry is safest for a DIY mini‑projector mod?
Lithium‑Polymer offers high energy density but requires strict protection; Li‑ion is similar but slightly more tolerant, while NiMH is the safest but bulkier and lower in capacity.
What C‑rating is appropriate for a projector that draws 2‑5 A?
Choose cells rated for at least 1C (e.g., a 2000 mAh cell for 2 A) or higher; a 2C rating provides a comfortable safety margin for peak currents.
How can I protect the custom pack from over‑discharge and short circuits?
Integrate a dedicated protection board with over‑discharge, over‑charge, over‑current, and short‑circuit safeguards between the cells and the projector.
What testing steps should I perform before using the modified battery?
Verify the pack’s voltage with a multimeter, conduct a load test at typical current, and check that the protection circuit trips under fault conditions before installation.