Introduction
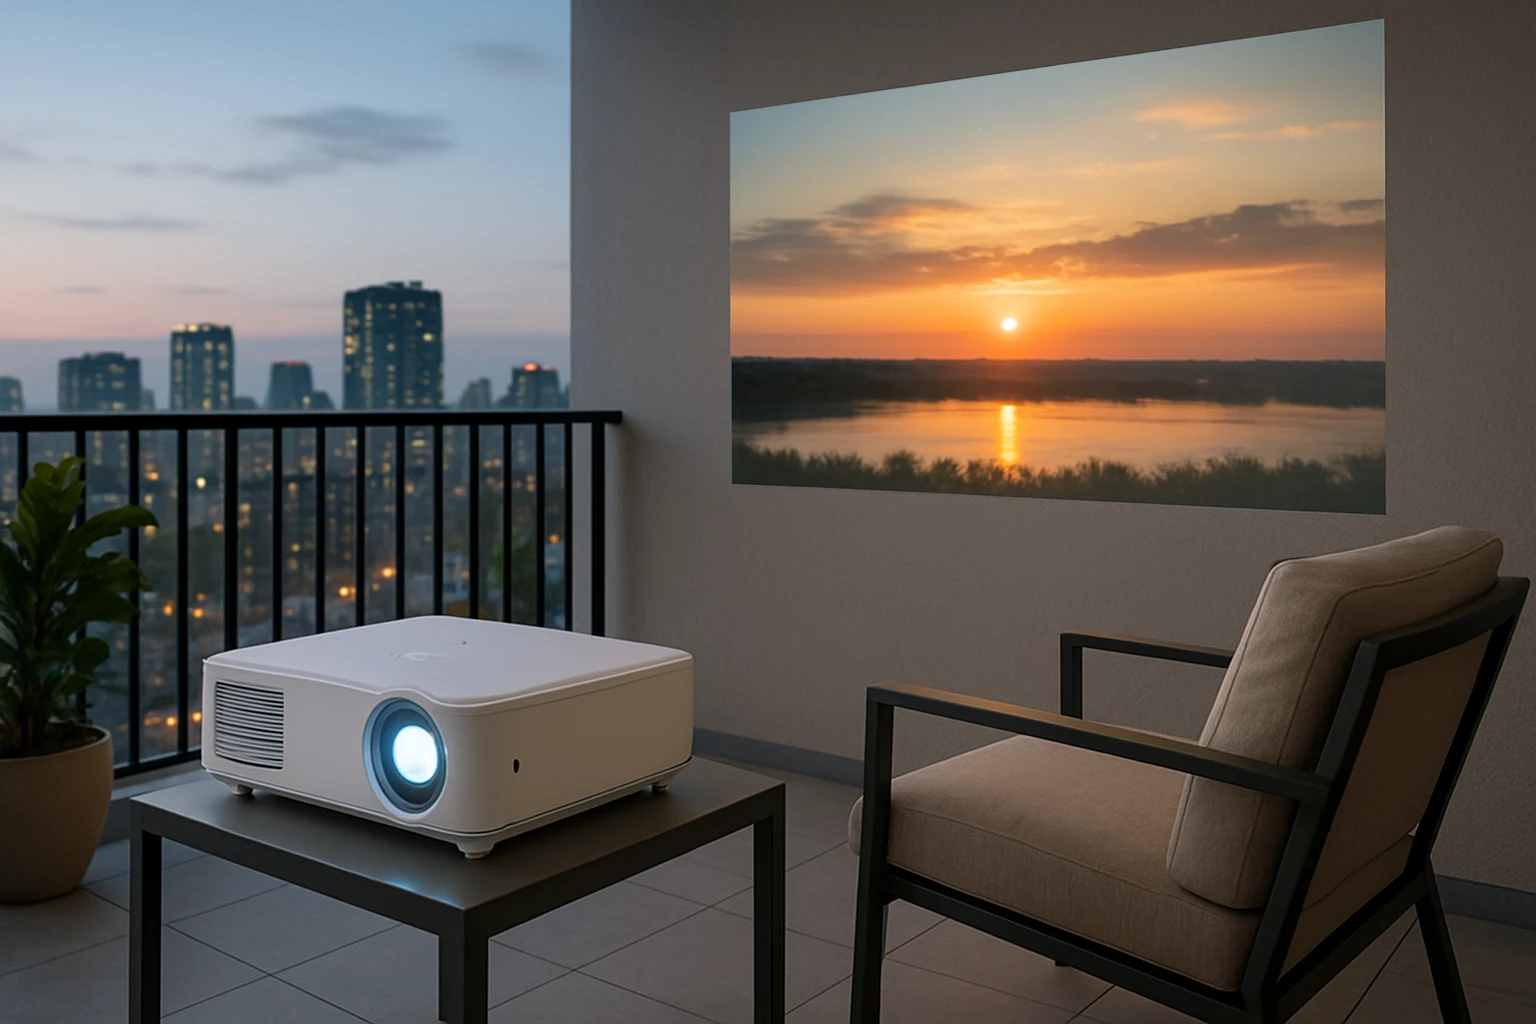
Balcony spaces have become popular venues for outdoor entertainment, and many residents choose to project movies, presentations, or gaming sessions from these elevated platforms. This guide explains the essential safety considerations, local building codes, and best‑practice strategies that ensure a secure and enjoyable projection experience. Readers will learn how to evaluate structural capacity, comply with fire and electrical regulations, and select the most appropriate mounting hardware. By following the recommendations, one can protect personal property, neighbors, and the building itself.
Background and Context
Apartment complexes are governed by a combination of municipal building codes, fire safety ordinances, and homeowners' association (HOA) rules. These regulations often address load‑bearing limits, permissible alterations to exterior surfaces, and the use of electrical equipment in semi‑outdoor environments. Understanding these frameworks is critical because non‑compliance can result in fines, loss of security deposits, or even eviction. Additionally, balconies are exposed to wind, moisture, and temperature fluctuations, which affect the durability of mounting solutions.
Understanding Local Codes and Regulations
Most jurisdictions require that any equipment installed on a balcony must not exceed the design load specified for the balcony floor. This load is typically expressed in pounds per square foot and includes the weight of occupants, furniture, and additional devices such as projectors. Residents should consult the building’s structural drawings or contact the property manager to verify the allowable load. In many cities, the fire department also mandates that projection equipment be positioned at least three feet away from fire‑exposed surfaces and that all wiring be rated for outdoor use.
HOA bylaws frequently contain clauses that restrict the alteration of balcony railings or the attachment of permanent fixtures. Before installing a mount, one must obtain written approval from the association and, if required, submit a detailed installation plan. Failure to secure permission can lead to removal orders and possible legal action. It is advisable to keep a copy of all correspondence for future reference.
Assessing Balcony Structure and Load Capacity
The first step in a safe installation is a thorough assessment of the balcony’s structural integrity. Residents should inspect the railing, floor joists, and any existing fixtures for signs of corrosion, cracks, or water damage. If the balcony is constructed of concrete, a drill‑in anchor may be permissible, whereas wooden balconies often require lag bolts with appropriate washers. When in doubt, a licensed structural engineer can provide a professional evaluation and certify that the proposed mount will not compromise safety.
Projector mounts vary widely in weight capacity. The BAISHUN Adjustable Projector Mount supports up to 4.4 lbs (2 kg), which is suitable for most portable and mini‑projectors. However, larger home‑theater units can weigh 10 lbs or more, requiring a heavier‑duty solution. Matching the mount’s capacity to the projector’s weight is a non‑negotiable safety requirement.
Electrical Safety Considerations
All wiring used for balcony projections must be rated for outdoor or damp‑location use, typically marked as UL‑listed or IEC‑approved. Extension cords should be of sufficient gauge to handle the projector’s power draw without overheating. It is prudent to employ a ground‑fault circuit interrupter (GFCI) outlet to protect against electric shock, especially in environments where moisture may accumulate.
Surge protectors can safeguard expensive electronics from voltage spikes caused by lightning or utility fluctuations. When routing cables, one should use cable clips or conduit that secure the wires to the balcony surface, preventing tripping hazards and accidental disconnection. Avoid running cords across walkways or under railings where they could be damaged by foot traffic.
Choosing the Right Mount for Balcony Use
For balcony installations, a mount must combine stability, adjustability, and a compact footprint. The BAISHUN Adjustable Projector Mount offers several features that address these needs: a heavy‑duty metal construction that eliminates wobble, 360‑degree rotation for optimal viewing angles, and a foldable design that stores easily when not in use. Its universal 1/4‑inch thread accommodates not only projectors but also DSLRs, ring lights, and microphones, making it a versatile accessory for content creators.
Key specifications include a tilt range of 30 degrees upward to 90 degrees downward, a weight capacity of 4.4 lbs, and a quick three‑hole installation process that works on both walls and ceilings. The product holds a 4.5‑star rating from 306 reviewers, indicating a high level of customer satisfaction. At a price of $9.99, it presents a cost‑effective solution for renters who cannot make permanent modifications to the balcony.
Installation Steps for a Secure Setup
Before beginning installation, gather all required tools: a drill with appropriate bits, a level, a screwdriver, and the mounting hardware supplied with the product. Verify that the selected mounting location complies with the load‑bearing limits and is at least three feet from any fire‑exposed surface. Mark the drill holes using a pencil and a level to ensure the mount will be perfectly horizontal.
Proceed to drill the holes and insert the supplied anchors, taking care not to overtighten, which could crack the balcony material. Attach the bracket securely with the included screws, then affix the universal head to the front of the bracket. Finally, mount the projector onto the head, adjust the tilt and swivel to achieve the desired picture geometry, and tighten the lock knobs. Test the setup with a short video to confirm stability before full‑scale use.
Maintenance and Ongoing Safety Checks
Regular maintenance extends the lifespan of both the mount and the projector. Inspect the mounting bolts monthly for signs of loosening, especially after exposure to wind or vibration. Clean the metal components with a dry cloth to prevent rust, and verify that the 1/4‑inch thread remains free of debris that could affect device attachment.
Seasonal weather changes may introduce new risks; for example, heavy rain can increase slip risk on the balcony floor. In such conditions, it is advisable to remove the projector and store it indoors, or at a minimum, cover the device with a waterproof sheath. Document any incidents or adjustments in a maintenance log to track the equipment’s condition over time.
Comparison and Selection Guide
The following table compares the BAISHUN Adjustable Projector Mount with two alternative solutions commonly considered for balcony use. The comparison focuses on load capacity, adjustability, installation method, and price.
| Feature | BAISHUN Adjustable Projector Mount | Heavy‑Duty Ceiling Mount (Example) | Portable Tripod Stand (Example) |
|---|---|---|---|
| Maximum Load | 4.4 lbs (2 kg) | 15 lbs (6.8 kg) | 5 lbs (2.3 kg) |
| Rotation | 360° swivel | 180° swivel | Fixed |
| Tilt Range | 30° up / 90° down | 45° up / 45° down | 15° up / 15° down |
| Installation | Wall or ceiling, 3‑hole | Ceiling only, requires joist | No installation required |
| Price | $9.99 | $39.99 | $24.99 |
| Rating (as of review) | 4.5/5 (306 reviews) | 4.2/5 (112 reviews) | 4.0/5 (87 reviews) |
For renters seeking a balance of affordability, ease of installation, and sufficient load capacity for mini‑projectors, the BAISHUN mount emerges as the most practical choice. Those with larger, heavier projectors may need to invest in a heavy‑duty ceiling mount, provided the balcony structure can accommodate the additional weight.
Best Practices and Practical Tips
- Confirm the balcony’s load rating with the property manager before mounting any equipment.
- Use only outdoor‑rated cables and a GFCI outlet to mitigate electrical hazards.
- Secure all mounting hardware with a torque wrench to the manufacturer’s recommended specifications.
- Position the projector away from direct sunlight to preserve image quality and prevent overheating.
- Employ a weather‑proof cover when the projector is not in use during inclement weather.
- Document the installation layout, including anchor locations, for future reference or removal.
Frequently Asked Questions
- Can I install the mount on a balcony railing? Most building codes prohibit attaching permanent fixtures to railings because they are not designed to bear additional loads. It is safer to install the mount on a solid wall or ceiling surface.
- What is the maximum distance a projector can be placed from the balcony wall? The optimal distance depends on the projector’s throw ratio. For short‑throw models, a distance of 2–4 feet is typical; consult the projector’s specifications for precise guidance.
- Is the BAISHUN mount compatible with ceiling‑mounted projectors? Yes, the mount can be installed on a ceiling using the three‑hole pattern, provided the ceiling material can support the 4.4‑lb load.
- Do I need a permit to install a projector mount on my balcony? In most residential settings, a permit is not required for lightweight, non‑structural mounts. However, always verify local regulations and HOA policies before proceeding.
- How often should I check the mount’s stability? Perform a visual and torque check at least once per month, and after any severe weather event, to ensure that all fasteners remain secure.
- Can I use the mount for devices other than projectors? The universal 1/4‑inch thread accommodates DSLRs, ring lights, webcams, LED video lights, and microphones, making it a versatile accessory for content creators.
- What should I do if the mount becomes loose? Immediately cease use, tighten all bolts to the recommended torque, and inspect the anchor points for damage. If the balcony material is compromised, seek professional repair before reinstalling.
Conclusion
Installing a projector on an apartment balcony can transform outdoor leisure time into a cinematic experience, provided that safety, code compliance, and proper equipment selection are prioritized. By understanding structural limits, adhering to electrical standards, and choosing a reliable mount such as the BAISHUN Adjustable Projector Mount, residents can enjoy high‑quality projections without jeopardizing personal or building safety. Ongoing maintenance and periodic inspections further ensure that the setup remains secure throughout its lifespan.
Products Featured in This Guide
BAISHUN Adjustable Projector Mount
Price: $9.99
Rating: 4.5 out of 5 stars (306 reviews)
Why it is featured: This mount provides rock‑solid stability, full 360° rotation, and a foldable design that is ideal for the limited space of apartment balconies. Its universal 1/4‑inch thread expands its usefulness beyond projectors, making it a versatile tool for creators who need a reliable, affordable mounting solution.
Frequently Asked Questions
What building codes and HOA rules apply to installing a projector on an apartment balcony?
You must follow municipal building codes, fire safety ordinances, and your HOA’s exterior‑modification policies, which often limit load, mounting, and electrical work.
How can I determine if my balcony can support the weight of a projector and its mount?
Check the balcony’s load‑bearing rating in your lease or building specs and add the projector and mount weight; if uncertain, consult a structural engineer or property manager.
What fire safety regulations should I observe when using a balcony projector?
Keep the projector at least three feet from combustible materials, use flame‑retardant cables, and ensure no open flames or heat sources are nearby.
Are there specific electrical requirements for powering a balcony projector?
Use UL‑listed, outdoor‑rated cords, plug into a GFCI‑protected outlet, and avoid overloading circuits per local electrical code.
What best‑practice mounting methods are recommended for balcony projectors?
Install a weather‑proof, adjustable bracket anchored to studs or reinforced railing, and seal all connections to protect against moisture.